I used to wear braids and cornrows a lot so I wanted to try a patterned cornrow style as I thought that would be the most difficult and time consuming and any other style would be easy breezy in comparison.
I'm going to use the previous practice model so I removed her [green hairstyle] by running warm water over the flock. After a minute of squishing her head I was able to peel it right off in a single layer. I later found that I could have done the same without water actually.
Because this is just a test of glue application there are some steps I didn't do; 1) remove the mold seam with a utility knife, 2) cover the head with flexible modeling paste to fill in and make the rooting holes disappear and 3) mix paint to match the flesh tone of her face.
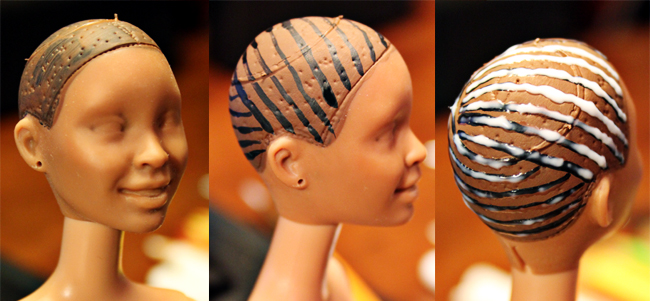
Instead, I used brown paint straight out the bottle and slapped 4 coats on her scalp with no other prep. Then, using black paint and a brush, I drew on my cornrow pattern. The third step is where a Elmer's bottle would have come in handy, but I don't have that. So, using a pointed brush with all its bristles glued shut, I dotted on mod podge to form lines over the black stripes.

My point in this is to build up a line of glue without it flattening or drooping down. I let the first layer of glue dry over the entire head completely to see if it would spread and it did a little bit. Right on top of this layer I apply the second layer of glue, dump flock over it and shake off the excess. Without pausing, I go back over it a 3rd time with another layer of glue and flock.

The second photo shows the glue completely dry which is why you should make your under color either white or the color of the flock you are using. If you use white, you'll already have a general idea of how your finished product might look because the glue is white. If you match the flock color, it won't look so sparse once it dries.

For the previous photos, I put down an entire row of glue and then flocked. I always feel like I'm giving the glue too long to dry so for these blue rows I put down about 1/4 inch of glue, flocked, shook off the excess and then repeated until one row was done. Because of this, it seemed like more flock was sticking to the glue, so I only did the one layer instead of adding one more.

Here she is completely dry. I really think that applying the glue/flock in small sections makes a big difference in the density of flock coverage and you can do less layers. I rubbed my hand all over her head while inking a face on her and the flock didn't come off. That doesn't mean, however, that this is a permanent hairdo like rooting. Just poke it a bit with your fingernail and you can pry the glue right up and off. Even knowing that, it's still fun to make different styles!

The only bad thing I can say about flock is that it gets everywhere! So much so that I eventually had to put on a dust mask while using it because it was affecting my sinuses. Shoot, I'm a delicate, freakin' flower. I can't be having stuff going all up in my nose and lungs and whatnots. Safety first! Protect yo-self before you rickety wreck yo-self. Word to Big Bird.
you are just super great at painting eyes.and for the hair i am speechless!!
ReplyDeleteHey there, Jassica Joe and thanks! ^__^
DeleteI really like cornrows, especially on young , handsome man :D On your doll it looks very nice, too.
ReplyDeleteYou had a great idea! They are pretty natural!
Jewel Snake, that would be a good look on a guy!
DeleteTe ha quedado super original¡ tienes una imaginacion muy grande¡¡¡ besos
ReplyDeleteHola Sarai, y gracias por tu comentario agradable!
DeleteWhat an awesome hair style! So fun and colorful ;D
ReplyDeleteMaybe it's a good thing you can pull it off easily, you can make hairstyles over an over again. (What's with the cheap commercial lines lately?!)
Tali, I do think that being able to take it off is good for multiple hairstyles especially if you like changing the same doll. (Cheap lines?! - ouch 0.o)
DeleteNeat way to create corn rows, Muff. Thanks for sharing.
ReplyDeletedbg
Hiya, DBG. Considering the mess it makes, it is pretty simple.
DeleteWhat a interesting and colorful hair style !!! This is very cool :) Congratulations.
ReplyDeleteGreetings from Poland ;)
Hi, Marille! If I was doing this intentionally I'm sure I wouldn't use such colorful flock, but it's nice for practice.
DeleteThat's a great idea, and a really cool looking result!
ReplyDeleteHiya, Anderson! It is cool. Now I just need to practice some more styles.
DeleteYour flocking looks like a lot of fun with a good result. The dust mask sounds like a good idea though, I imagine the flocking material wouldn't be all that good for your lungs.
ReplyDeleteCarrickters, I don't see anything that says it's toxic (or not) but if you're the type with allergies it will definitely affect you.
DeleteHello from Spain: you are very creative. Great idea. Interesting hairstyles. Keep in touch
ReplyDeleteHello, Marta and thanks for your comment! ^__^
DeleteLove the idea and the look you created! That flocking material was definitely a great purchase!
ReplyDeleteRossetti, and the flock was on sale too so that makes me like it even more, lol.
DeleteI told you you would like flock. Very creative cornrows. Did you buy it locally, or on-line?
ReplyDeleteVanessa, I got the flock on clearance at Joann's. You can see the great colors included in the pack in this post.
DeleteThumbs up ... neat new (to me) way to create cornrows. Thanks for sharing ;-D
ReplyDeleteDana, so far I've only seen flock applied as a straight full coverage hair style so I do like the idea of having many more ethnic styles I can try.
DeleteWOW! I love her steampunk look!!
ReplyDeleteHey, Sergio! It is kind of steampunkish in color. *nod nod*
DeleteGreat post Muff! I love the cornrows. I need to do this on some of my guys. This would give them a different look. Maybe, I can do it on my Steven with bad hair...cut off his hair and give him cornrows. Lol! Thanks for sharing!
ReplyDeleteThanks, Georgia Girl! I only have one black guy and he already came with flocked hair. I need to get one of the black beach guys that only cost 5 bucks and experiment with him or troll some different thrift stores.
DeleteHAHA love the title! LOL Safety first! Protect yo self before you rickity wreck yo self! LOL By the way love how you experimented with the different colors, it is very RAINBOW DASH!!! Lol she is defiantly my fave My Little Pony.
ReplyDeleteHi, Tracey! At first I was using the different colors as testers so I wouldn't use up the one color I really wanted, black. But so far, I'm not minding the other colors at all.
DeleteI've been wanting to do a kendrick lamar inspired hairstyle on one of my extra Flavas Tre dolls and i need to do the lines in his hair so this might work! Might have to build the flocking up and play with it to get the texture right.
ReplyDeleteJay, the tutorials I've read said that to make lines you should pull through the flock with a toothpick or press the lines into the head with the toothpick. I wanted the scalp to show through though and that didn't happen neatly with the toothpick method. It might if you had a bald head, but one with rooting holes just looked messy.
DeleteI love your experiments! Speaking of the modeling paste, do you recomend any?
ReplyDeleteThanks, IHime. The only modeling paste I can recommend is Liquitex as it's the only brand I've ever used. If you are applying it to a vinyl doll then the flexible modeling paste is best as it gives you some movement to interact with the soft vinyl. I would use painters or masking tape first to define what areas you don't want affected and then remove them as soon as you put your first coat down or they will rip off sections of the paste if you let it harden over the tape.
Delete